بازشناسی تصویر در پایتون با API تنسورفلو — به زبان ساده
راهکارهای متعددی برای انجام «بازشناسی تصویر» (Image Recognition) وجود دارد. گوگل، یک «رابط برنامهنویسی کاربردی» (Application Programming Interface | API) «تشخیص شی» (Object Detection) برای کتابخانه پایتون «تنسورفلو» (Tensorflow) منتشر کرده است که این کار را سادهتر ساخته و به انجام آن سرعت میبخشد. در ادامه، این API معرفی شده و عملکرد آن برای تشخیص شی در ویدئوهای یوتیوب مورد بررسی قرار خواهد گرفت. در زیر، نمونهای از تشخیص شی در ویدئوها با استفاده از این API تنسورفلو، قابل مشاهده است.

همانطور که پیشتر بیان شد، TensorFlow Object Detection API برای تشخیص شی – با بهرهگیری از کادرهای متمایزکننده – در تصاویر و ویدئوها کاربرد دارد. برای استفاده از این API، ابتدا باید از نصب بودن TensorFlow و همه وابستگیهای آن اطمینان حاصل کرد. برای CPU TensorFlow میتوان از دستور pip install tensorflow استفاده کرد. اما قطعا، نسخه GPU این کتابخانه بسیار سریعتر از نسخه CPU آن است، بنابراین گزینهای ایدهآل محسوب میشود. افرادی که کامپیوتر آنها GPU قدرتمندی ندارد میتوانند از سرویسهای ابری مناسب این کار استفاده کنند. دیگر مواردی که نصب کردن آنها لازم است در ادامه بیان شدهاند.
pip install pillow
pip install lxml
pip install jupyter
pip install matplotlib
آشنایی با API تشخیص شی کتابخانه تنسورفلو
در این مطلب، API تشخیص شی کتابخانه تنسورفلو، روی مجموعه داده COCO آموزش داده شده که مربوط به اشیای متداول در تصاویر و ویدئوها است. این کتابخانه سیصد هزار تصویر از ۹۰ شی که مکررا در زمینههای مختلف وجود دارند را دربرمیگیرد. مثالهایی از این موارد در تصویر زیر آمده است.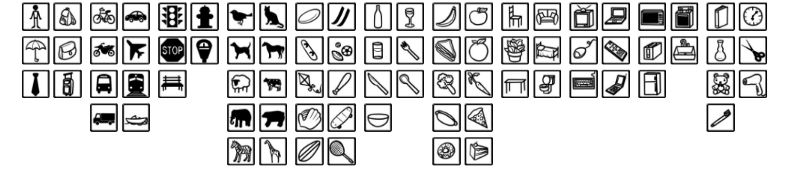
برخی از اشیای موجود در مجموعه داده COCO
این API، پنج مدل مختلف را دربرمیگیرد که موازنهای بین سرعت اجرا و صحت کادرهای متمایزکننده، ایجاد میکنند. جدول زیر در همین رابطه، قابل توجه است.
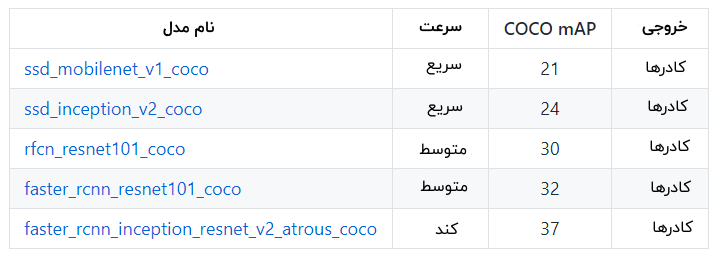
در جدول بالا، mAP (دقت متوسط میانگین | Mean Average Precision)، ضرب «دقت» (Precision) و «صحت» (Recall) کادرهای متمایز کننده است. این سنجه، معیار ترکیبی مناسبی برای بررسی میزان حساسیت شبکه به اشیا و چگونگی اجتناب از هشدارهای غلط محسوب میشود. هر چه امتیاز mAP بالاتر باشد، شبکه صحت بیشتری خواهد داشت، اما هزینه اجرا کاهش پیدا میکند.
استفاده از API
برای بررسی کارایی این API، از یکی از سبکترین مدلها (ssd_mobilenet) استفاده شده است. گامهای اصلی برای انجام پیادهسازی در ادامه بیان شدهاند.
- دانلود کردن مدل فریز شده (pb — protobuf.) و بارگذرای آن در حافظه.
- استفاده از کد توکار کمکی برای بارگذاری برچسبها، دستهها، ابزارهای بصریسازی و دیگر موارد.
- باز کردن یک جلسه کاری جدید و اجرای مدل روی تصویر.
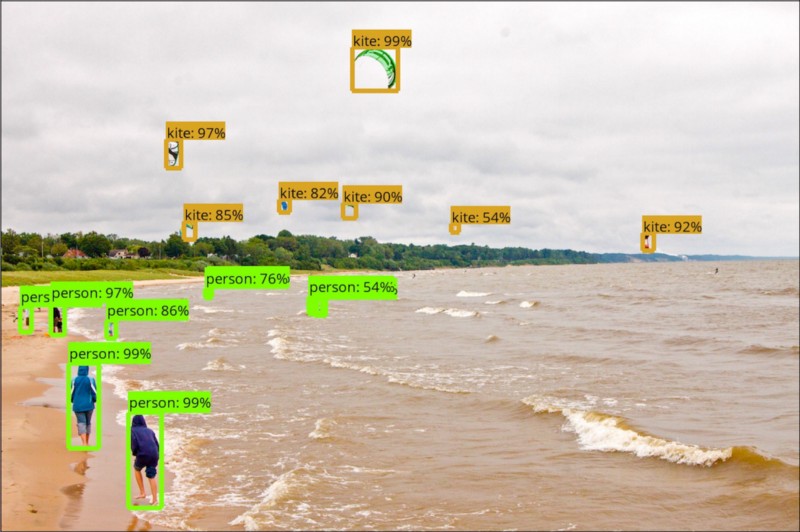
مستدات API، حاوی یک فایل «ژوپیتر نوتبوک» (Jupyter notebook) است که سه گام بالا را در بر میگیرد. مدل، کارایی بسیار حوبی روی تصاویر نمونه داشته است و میتوان نمونهای از آن را در تصویر زیر مشاهده کرد.
کدهای مورد استفاده برای این پروژه، در ادامه آمدهاند.
ورودی ۱
import os
import cv2
import time
import argparse
import multiprocessing
import numpy as np
import tensorflow as tf
from matplotlib import pyplot as plt
%matplotlib inline
ورودی ۲
from object_detection.utils import label_map_util
from object_detection.utils import visualization_utils as vis_util
ورودی ۳
CWD_PATH = os.getcwd()
# Path to frozen detection graph. This is the actual model that is used for the object detection.
MODEL_NAME = ‘ssd_mobilenet_v1_coco_11_06_2017’
PATH_TO_CKPT = os.path.join(CWD_PATH, ‘object_detection’, MODEL_NAME, ‘frozen_inference_graph.pb’)
# List of the strings that is used to add correct label for each box.
PATH_TO_LABELS = os.path.join(CWD_PATH, ‘object_detection’, ‘data’, ‘mscoco_label_map.pbtxt’)
ورودی ۴
NUM_CLASSES = 90
# Loading label map
label_map = label_map_util.load_labelmap(PATH_TO_LABELS)
categories = label_map_util.convert_label_map_to_categories(label_map, max_num_classes=NUM_CLASSES,
use_display_name=True)
category_index = label_map_util.create_category_index(categories)
ورودی ۵
def detect_objects(image_np, sess, detection_graph):
# Expand dimensions since the model expects images to have shape: [1, None, None, 3]
image_np_expanded = np.expand_dims(image_np, axis=0)
image_tensor = detection_graph.get_tensor_by_name(‘image_tensor:0’)
# Each box represents a part of the image where a particular object was detected.
boxes = detection_graph.get_tensor_by_name(‘detection_boxes:0’)
# Each score represent how level of confidence for each of the objects.
# Score is shown on the result image, together with the class label.
scores = detection_graph.get_tensor_by_name(‘detection_scores:0’)
classes = detection_graph.get_tensor_by_name(‘detection_classes:0’)
num_detections = detection_graph.get_tensor_by_name(‘num_detections:0’)
# Actual detection.
(boxes, scores, classes, num_detections) = sess.run(
[boxes, scores, classes, num_detections],
feed_dict={image_tensor: image_np_expanded})
# Visualization of the results of a detection.
vis_util.visualize_boxes_and_labels_on_image_array(
image_np,
np.squeeze(boxes),
np.squeeze(classes).astype(np.int32),
np.squeeze(scores),
category_index,
use_normalized_coordinates=True,
line_thickness=8)
return image_np
ورودی ۶
# First test on images
PATH_TO_TEST_IMAGES_DIR = ‘object_detection/test_images’
TEST_IMAGE_PATHS = [ os.path.join(PATH_TO_TEST_IMAGES_DIR, ‘image{}.jpg’.format(i)) for i in range(1, 3) ]
# Size, in inches, of the output images.
IMAGE_SIZE = (12, 8)
ورودی ۷
def load_image_into_numpy_array(image):
(im_width, im_height) = image.size
return np.array(image.getdata()).reshape(
(im_height, im_width, 3)).astype(np.uint8)
ورودی ۸
from PIL import Image
for image_path in TEST_IMAGE_PATHS:
image = Image.open(image_path)
image_np = load_image_into_numpy_array(image)
plt.imshow(image_np)
print(image.size, image_np.shape)
ورودی ۹
#Load a frozen TF model
detection_graph = tf.Graph()
with detection_graph.as_default():
od_graph_def = tf.GraphDef()
with tf.gfile.GFile(PATH_TO_CKPT, ‘rb’) as fid:
serialized_graph = fid.read()
od_graph_def.ParseFromString(serialized_graph)
tf.import_graph_def(od_graph_def, name=”)
ورودی ۱۰
with detection_graph.as_default():
with tf.Session(graph=detection_graph) as sess:
for image_path in TEST_IMAGE_PATHS:
image = Image.open(image_path)
image_np = load_image_into_numpy_array(image)
image_process = detect_objects(image_np, sess, detection_graph)
print(image_process.shape)
plt.figure(figsize=IMAGE_SIZE)
plt.imshow(image_process)
(۶۳۶, ۱۰۲۴, ۳)
(۹۰۰, ۱۳۵۲, ۳)
اجرای API روی ویدئوها
در ادامه، این API روی برخی از ویدئوها آزموده شده است. برای انجام این کار، از کتابخانه پایتون moviepy استفاده شده است. گامهای اساسی در این راستا، عبارتند از:
- استفاده از تابع VideoFileClip برای استخراج تصاویر از ویدئوها
- تابع fl_image تابعی فوقالعاده است که میتواند تصاویر را دریافت و آنها را با یک تصویر ویرایش شده جایگزین کند. در اینجا، از این تابع برای شناسایی شی در تصاویر استخراج شده از ویدئوها استفاده شده است. اجرای این کد برای یک کلیپ ۳ الی ۴ ثانیهای، اندکی زمان میبرد (تقریبا یک دقیقه). اما برای مثال مطرح شده در این مطلب، از آنجا که یک مدل فریز و بارگذاری شده در حافظه مورد استفاده قرار گرفته است، امکان انجام همه این کارها روی کامپیوتر بدون GPU نیز وجود دارد.
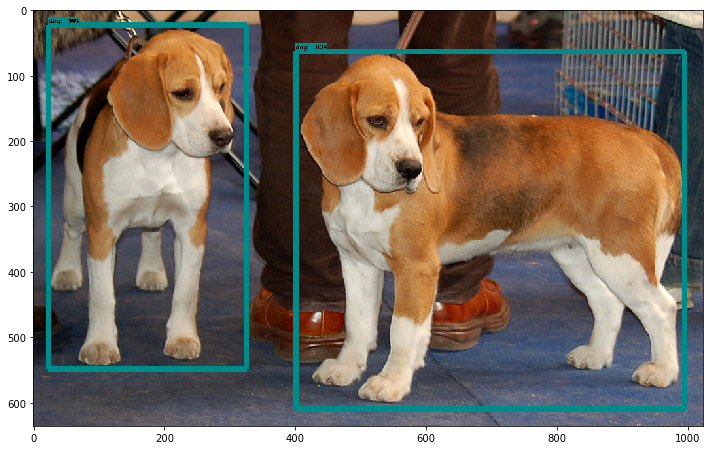
نتایج حاصل از اجرای API تشخیص شی تنسورفلو روی ویدئو، بسیار جالب توجه است. تنها با چندین خط کد، تعداد خوبی از اشیای متداول موجود در تصاویر با صحت خوبی شناسایی و دور آنها کادر کشیده شده است. البته، شرایطهایی نیز وجود دارد که به نظر میرسد در آنها، امکان بهبود صحت هست. برای مثال، پرندههای موجود در ویدئو نمونه زیر، شناسایی نشدهاند.
کدهای مورد استفاده برای این پروژه، در ادامه آمدهاند.
ورودی ۱۱
# Import everything needed to edit/save/watch video clips
from moviepy.editor import VideoFileClip
from IPython.display import HTML
ورودی ۱۲
def process_image(image):
# NOTE: The output you return should be a color image (3 channel) for processing video below
# you should return the final output (image with lines are drawn on lanes)
with detection_graph.as_default():
with tf.Session(graph=detection_graph) as sess:
image_process = detect_objects(image, sess, detection_graph)
return image_process
ورودی ۱۳
white_output = ‘video1_out.mp4’
clip1 = VideoFileClip(“video1.mp4”).subclip(0,2)
white_clip = clip1.fl_image(process_image) #NOTE: this function expects color images!!s
%time white_clip.write_videofile(white_output, audio=False)
[MoviePy] >>>> Building video video1_out.mp4
[MoviePy] Writing video video1_out.mp4
۱۰۰%|██████████| ۴۸/۴۸ [۰۰:۳۳<00:00, 1.44it/s]
[MoviePy] Done.
[MoviePy] >>>> Video ready: video1_out.mp4
CPU times: user 1min 6s, sys: 3.29 s, total: 1min 10s
Wall time: 33.9 s
ورودی ۱۴
HTML(“””
<video width=”960″ height=”540″ controls>
<source src=”{0}”>
</video>
“””.format(white_output))
ورودی ۱۵
white_output1 = ‘cars_out.mp4’
clip1 = VideoFileClip(“cars.mp4”).subclip(0,2)
white_clip = clip1.fl_image(process_image) #NOTE: this function expects color images!!s
%time white_clip.write_videofile(white_output1, audio=False)
[MoviePy] >>>> Building video cars_out.mp4
[MoviePy] Writing video cars_out.mp4
۱۰۰%|██████████| ۶۰/۶۰ [۰۰:۴۴<00:00, 1.38it/s]
[MoviePy] Done.
[MoviePy] >>>> Video ready: cars_out.mp4
CPU times: user 1min 25s, sys: 4.6 s, total: 1min 30s
Wall time: 44.4 s
ورودی ۱۶
HTML(“””
<video width=”960″ height=”540″ controls>
<source src=”{0}”>
</video>
“””.format(white_output1))
ورودی ۱۷
white_output2 = ‘fruits1_out.mp4’
clip2 = VideoFileClip(“fruits1.mp4”).subclip(0,1)
white_clip = clip2.fl_image(process_image) #NOTE: this function expects color images!!s
%time white_clip.write_videofile(white_output2, audio=False)
[MoviePy] >>>> Building video fruits1_out.mp4
[MoviePy] Writing video fruits1_out.mp4
۱۰۰%|██████████| ۳۰/۳۰ [۰۰:۲۱<00:00, 1.42it/s]
[MoviePy] Done.
[MoviePy] >>>> Video ready: fruits1_out.mp4
CPU times: user 41.9 s, sys: 1.65 s, total: 43.6 s
Wall time: 21.3 s
ورودی ۱۸
HTML(“””
<video width=”960″ height=”540″ controls>
<source src=”{0}”>
</video>
“””.format(white_output2))
ورودی ۱۹
white_output3 = ‘dog_out.mp4’
clip3 = VideoFileClip(“dog.mp4”).subclip(12,14)
white_clip = clip3.fl_image(process_image) #NOTE: this function expects color images!!s
%time white_clip.write_videofile(white_output3, audio=False)
[MoviePy] >>>> Building video dog_out.mp4
[MoviePy] Writing video dog_out.mp4
۱۰۰%|██████████| ۶۰/۶۰ [۰۰:۴۳<00:00, 1.43it/s]
[MoviePy] Done.
[MoviePy] >>>> Video ready: dog_out.mp4
CPU times: user 1min 25s, sys: 3.58 s, total: 1min 29s
Wall time: 43.7 s
ورودی ۲۰
HTML(“””
<video width=”960″ height=”540″ controls>
<source src=”{0}”>
</video>
“””.format(white_output3))
ورودی ۲۱
# Merge videos
from moviepy.editor import VideoFileClip, concatenate_videoclips
clip1 = VideoFileClip(“cars_out.mp4”)
clip2 = VideoFileClip(“fruits1_out.mp4”)
clip3 = VideoFileClip(“dog_out.mp4”)
final_clip = concatenate_videoclips([clip1,clip2,clip3], method=”compose”)
final_clip.write_videofile(“my_concatenation.mp4″,bitrate=”5000k”)
[MoviePy] >>>> Building video my_concatenation.mp4
[MoviePy] Writing video my_concatenation.mp4
۱۰۰%|██████████| ۱۵۰/۱۵۰ [۰۰:۰۰<00:00, 189.12it/s]
[MoviePy] Done.
[MoviePy] >>>> Video ready: my_concatenation.mp4
ورودی ۲۲
from moviepy.editor import *
clip = VideoFileClip(“my_concatenation.mp4”)
clip.write_gif(“final.gif”)
[MoviePy] Building file final.gif with imageio
۱۰۰%|██████████| ۱۵۱/۱۵۱ [۰۰:۱۱<00:00, 12.35it/s]
گام بعدی
چندین ایده دیگر برای استفادههای آتی از این API وجود دارد که در ادامه بیان شدهاند.
- تلاش برای استفاده از مدلهای با صحت و در عین حال سربار بالاتر و مشاهده میزان تفاوت آنها
- پیدا کردن راههای افزایش سرعت API که به آن، امکان انجام تشخیص شی بلادرنگ را در دستگاههای موبایل میدهد.
- گوگل امکان استفاده از این مدلها برای «یادگیری انتقال» (Transfer learning) را فراهم میکند.
اگر نوشته بالا برای شما مفید بوده، آموزشهای زیر نیز به شما پیشنهاد میشوند:
- مجموعه آموزش هوش مصنوعی
- آموزش پردازش تصویر در متلب
- مجموعه آموزشهای دادهکاوی و یادگیری ماشین
- بازشناسی تصویر با Keras و شبکه های عصبی پیچشی — راهنمای کاربردی
- بازشناسی چهره (Face Recognition) پیشرفته با استفاده از اکسل — به زبان ساده
مجموعه: پردازش تصویر, یادگیری ماشینی
