آموزش ایجاد ماشین حساب با برنامه نویسی GUI در متلب
در این مقاله چگونگی ساخت و ایجاد یک ماشین حساب با برنامه نویسی GUI در متلب آموزش داده شده است. پیش از مطالعه و استفاده از آموزشهای ارائه شده در این نوشته، مطالعه مقاله «آموزش ایجاد رابط گرافیکی ساده در متلب» برای آشنایی بیشتر با GUI در متلب پیشنهاد میشود. در ادامه هر یک از گامهای ایجاد و ساخت ماشین حساب با برنامه نویسی GUI در متلب شرح داده شدهاند.
گام اول ایجاد ماشین حساب با برنامه نویسی GUI در متلب
ابتدا باید پنجره دستور یا همان خط فرمان متلب را باز و سپس دستور زیر را وارد کرد:
>>guideگام دوم ایجاد ماشین حساب با برنامه نویسی GUI در متلب
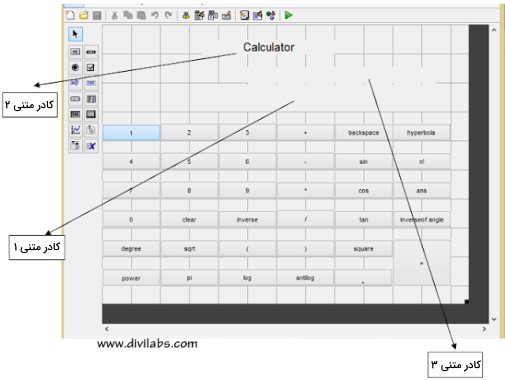
در این گام، بستر رابط کاربری گرافیکی (GUI) ایجاد و مشخص میشود که ظاهر برنامه ماشین حساب چگونه باید باشد. در این گام، باید دکمهها و متنهای لازم در رابط کاربری اضافه شوند. برای آموزش ایجاد ماشین حساب در این مقاله، ۳۵ دکمه برای کارکردهای مختلف مربوط به ماشین حساب تعیین شده است. همچنین، سه کادر متنی ایستا (ثابت) نیز اضافه شده که اولی عنوان ماشین حساب یعنی «Calculator» را نمایش میدهد. دومی، ورودی دریافت شده به وسیله دکمهها را نمایش خواهد داد و آخرین کادر متنی نیز برای نمایش نتایج استفاده خواهد شد.

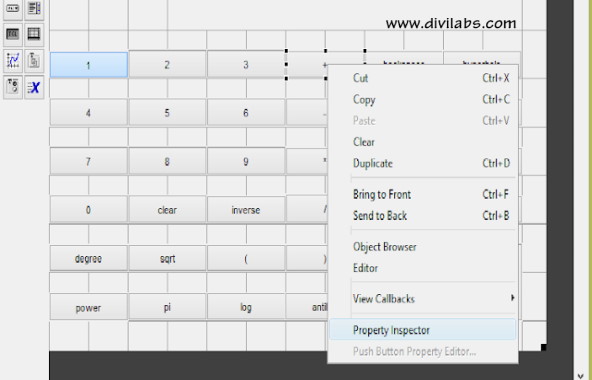
میتوان نام رشته را در قسمت Property Inspector تغییر داد؛ منظور نام دکمههای مربوطه و همچنین برچسب (Tag) آنهاست که نام تابع فراخوانی مجدد دکمه مربوطه را بازتاب میدهد. مطابق تصویر زیر، با راست کلیک کردن روی یک دکمه و انتخاب گزینه «Property Inspector» میتوان به این تنظیمات دسترسی پیدا کرد:

برخی دیگر از تنظیمات مربوط به بخش Property Inspector نیز در تصویر زیر نمایش داده شدهاند:

بنابراین، برای دکمه مربوط به عملیات جمع یعنی دکمه «+»، باید مقدار مشخصه String را به «+» تغییر داد تا علامت به اضافه روی دکمه نمایش داده شود. همچنین، برای مشخصه Tag نیز مقدار «pushbuttonplus» قرار داده میشود تا بعداً در زمان نوشتن کدها هم برای نام تابع فراخوانی مجدد مربوط به این دکمه از عبارت pushbuttonplus استفاده شود. این نامگذاریها را میتوان به دلخواه انجام داد. همین کارها باید برای سایر دکمههای رابط کاربری هم انجام شوند. علاوه بر این، میتوان رنگها، بزرگی فونتها و اندازه دکمهها را هم مطابق سلیقه تغییر داد و تنظیم کرد.
گام سوم ایجاد ماشین حساب با برنامه نویسی GUI در متلب
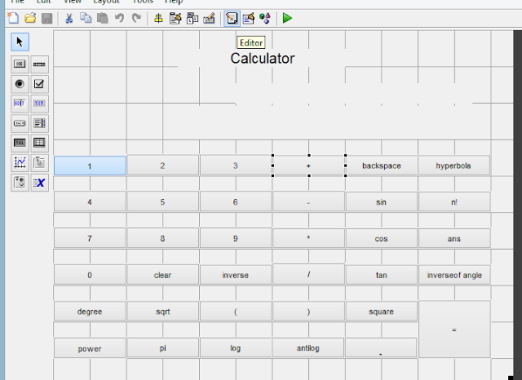
پس از اتمام تغییرات لازم، میتوان تنظیمات را ذخیره و بخش ویرایشگر را برای اضافه کردن کدهای برنامه باز کرد. محل دکمه ویرایشگر GUI متلب در تصویر زیر نمایش داده شده است:

گام چهارم ایجاد ماشین حساب با برنامه نویسی GUI در متلب
اکنون زمان آن فرا رسیده است تا هر یک از توابع مربوط به دکمهها بر اساس نیاز برنامه نویسی شوند. در برنامه نویسی این پروژه برخی از توابع متلب به دفعات مورد استفاده قرار گرفتهاند. بنابراین بهتر است این توابع در ادامه معرفی شوند.
تابع Set
این تابع برای تنظیم هر بلوک در زمان فراخوانی دکمه مربوطه استفاده میشود. مثلاً :
set (handles.text1,’string’,’vijaysharma’);خط کد فوق به این معنی است که هر گاه pushbutton1 فراخوانی شود، مقدار text1 عبارت «vijaysharma» خواهد بود.
تابع Get
این تابع برای دریافت دادهها از هر بلوک استفاده میشود. برای مثال اگر دستور زیر را داشته باشیم:
New=get( handles.text1.’string’);این یعنی دادهها از text1 دریافت میشوند و در New ذخیره خواهند شد.
تابع strcat
این تابع برای ملحق کردن دو رشته با یکدیگر استفاده میشود. برای مثال:
strcat(new,old);خط کد بالا به این معنی است که رشتههای new و old باید به یکدیگر اضافه شوند.
تابع eval
تابع eval برای محاسبه مقدار عبارت رشتهای داده شده مورد استفاده قرار میگیرد. مثلاً:
eval(‘۱+۲+۳*۲’);خروجی خط کد فوق برابر با عدد ۹ است. در صورت نیاز میتوان اطلاعات بیشتری راجع به هر یک از توابع فوق در مستندات متلب به دست آورد.
گام پنجم ایجاد ماشین حساب با برنامه نویسی GUI در متلب
در این گام، کدهای لازم برای ایجاد ماشین حساب با برنامه نویسی GUI در متلب پیادهسازی میشوند. این کدها در ادامه آمده است. توضیحات لازم مربوط به هر بخش از برنامه به صورت کامنت ارائه شده است.
function varargout = question4(varargin)

gui_Singleton = 1;
gui_State = struct('gui_Name',       mfilename, ...
                   'gui_Singleton',  gui_Singleton, ...
                   'gui_OpeningFcn', @question4_OpeningFcn, ...
                   'gui_OutputFcn',  @question4_OutputFcn, ...
                   'gui_LayoutFcn',  [] , ...
                   'gui_Callback',   []);
if nargin && ischar(varargin{1})
    gui_State.gui_Callback = str2func(varargin{1});
end

if nargout
    [varargout{1:nargout}] = gui_mainfcn(gui_State, varargin{:});
else
    gui_mainfcn(gui_State, varargin{:});
end

function question4_OpeningFcn(hObject, eventdata, handles, varargin)
handles.output = hObject;

% Update handles structure
guidata(hObject, handles);


% --- Outputs from this function are returned to the command line.
function varargout = question4_OutputFcn(hObject, eventdata, handles)

varargout{1} = handles.output;


% --- Executes on button press in pushbutton2.
function pushbutton2_Callback(hObject, eventdata, handles)
old=get(handles.text1,'string');
new=('2');
new1=strcat(old,new);           % add two different strings
set(handles.text1,'string',new1);

% --- Executes on button press in pushbutton3.
function pushbutton3_Callback(hObject, eventdata, handles)
old=get(handles.text1,'string');
new=('3');
new1=strcat(old,new);
set(handles.text1,'string',new1);

% --- Executes on button press in pushbutton4.
function pushbutton4_Callback(hObject, eventdata, handles)
old=get(handles.text1,'string');
new=('4');
new1=strcat(old,new);
set(handles.text1,'string',new1);

% --- Executes on button press in pushbutton5.
function pushbutton5_Callback(hObject, eventdata, handles)
old=get(handles.text1,'string');
new=('5');
new1=strcat(old,new);
set(handles.text1,'string',new1);

% --- Executes on button press in pushbutton6.
function pushbutton6_Callback(hObject, eventdata, handles)
old=get(handles.text1,'string');
new=('6');
new1=strcat(old,new);
set(handles.text1,'string',new1);

% --- Executes on button press in pushbutton7.
function pushbutton7_Callback(hObject, eventdata, handles)
old=get(handles.text1,'string');
new=('7');
new1=strcat(old,new);
set(handles.text1,'string',new1);

% --- Executes on button press in pushbutton8.
function pushbutton8_Callback(hObject, eventdata, handles)
old=get(handles.text1,'string');
new=('8');
new1=strcat(old,new);
set(handles.text1,'string',new1);


% --- Executes on button press in pushbutton9.
function pushbutton9_Callback(hObject, eventdata, handles)
old=get(handles.text1,'string');
new=('9');
new1=strcat(old,new);
set(handles.text1,'string',new1);

% --- Executes on button press in pushbutton10.
function pushbutton10_Callback(hObject, eventdata, handles)
old=get(handles.text1,'string');
new=('0');
new1=strcat(old,new);
set(handles.text1,'string',new1);

% --- Executes on button press in pushbuttonclear.
function pushbuttonclear_Callback(hObject, eventdata, handles)
set(handles.text1,'string', '');    % used for clear the static box with null vector

% --- Executes on button press in pushbutton1.
function pushbutton1_Callback(hObject, eventdata, handles)
old=get(handles.text1,'string');
new=('1');
new1=strcat(old,new);
set(handles.text1,'string',new1);


% --- Executes on button press in pushbuttonminus.
function pushbuttonminus_Callback(hObject, eventdata, handles)
old=get(handles.text1,'string');
new=('-');
new1=strcat(old,new);
set(handles.text1,'string',new1);

% --- Executes on button press in pushbuttonequal.
function pushbuttonequal_Callback(hObject, eventdata, handles)
old=get(handles.text1,'string');
new=eval(old);          % calculate value expression passed in a string
set(handles.text3,'string',new);
set(handles.text1,'string', '');


% --- Executes on button press in pushbuttonplus.
function pushbuttonplus_Callback(hObject, eventdata, handles)
old=get(handles.text1,'string');
new=('+');
new1=strcat(old,new);
set(handles.text1,'string',new1);

% --- Executes on button press in pushbuttonmultiply.
function pushbuttonmultiply_Callback(hObject, eventdata, handles)
old=get(handles.text1,'string');
new=('*');
new1=strcat(old,new);
set(handles.text1,'string',new1);

% --- Executes on button press in pushbuttondivide.
function pushbuttondivide_Callback(hObject, eventdata, handles)
old=get(handles.text1,'string');
new=('/');
new1=strcat(old,new);
set(handles.text1,'string',new1);


% --- Executes on button press in pushbuttondegree.
function pushbuttondegree_Callback(hObject, eventdata, handles)
old=get(handles.text1,'string');
new= char();
for i= 1: (length (old))-1      % combination of both back space and add string so that we can delate bracket of sin and add hyperbola
  new(i)=old(i);
end
new1=('d(');
new2=strcat(new,new1);
set(handles.text1,'string',new2);

% --- Executes on button press in pushbuttonsin.
function pushbuttonsin_Callback(hObject, eventdata, handles)
old=get(handles.text1,'string');
new=('sin(');
new1=strcat(old,new);
set(handles.text1,'string',new1);

% --- Executes on button press in pushbuttoncos.
function pushbuttoncos_Callback(hObject, eventdata, handles)
old=get(handles.text1,'string');
new=('cos(');
new1=strcat(old,new);
set(handles.text1,'string',new1);

% --- Executes on button press in pushbuttontan.
function pushbuttontan_Callback(hObject, eventdata, handles)
old=get(handles.text1,'string');
new=('tan(');
new1=strcat(old,new);
set(handles.text1,'string',new1);

% --- Executes on button press in pushbuttonleftbracket.
function pushbuttonleftbracket_Callback(hObject, eventdata, handles)
old=get(handles.text1,'string');
new=(')');
new1=strcat(old,new);
set(handles.text1,'string',new1);

% --- Executes on button press in pushbuttonrightbracket.
function pushbuttonrightbracket_Callback(hObject, eventdata, handles)
old=get(handles.text1,'string');
new=('(');
new1=strcat(old,new);
set(handles.text1,'string',new1);

% --- Executes on button press in pushbuttonsqurt.
function pushbuttonsqurt_Callback(hObject, eventdata, handles)
old=get(handles.text1,'string');
new=('sqrt(');          % used for square root of any number
new1=strcat(old,new);
set(handles.text1,'string',new1);

% --- Executes on button press in pushbuttonbackspace.
function pushbuttonbackspace_Callback(hObject, eventdata, handles)
old=get(handles.text1,'string');
new= char();
for i= 1: (length (old))-1      % delate last charcter from a string

   new(i)=old(i);
end
set(handles.text1,'string',new);

% --- Executes on button press in pushbuttonsquare.
function pushbuttonsquare_Callback(hObject, eventdata, handles)
old=get(handles.text1,'string');
new=('^2');                % power of 2
new1=strcat(old,new);
set(handles.text1,'string',new1);

% --- Executes on button press in pushbuttonpower.
function pushbuttonpower_Callback(hObject, eventdata, handles)
old=get(handles.text1,'string');
new=('^');              % power symbol of any number
new1=strcat(old,new);
set(handles.text1,'string',new1);

% --- Executes on button press in pushbuttonpi.
function pushbuttonpi_Callback(hObject, eventdata, handles)
old=get(handles.text1,'string');
new=('pi');
new1=strcat(old,new);
set(handles.text1,'string',new1);

% --- Executes on button press in pushbuttonlog.
function pushbuttonlog_Callback(hObject, eventdata, handles)
old=get(handles.text1,'string');
new=('log(');           % used for taking log of any number
new1=strcat(old,new);
set(handles.text1,'string',new1);

% --- Executes on button press in pushbuttonantilog.
function pushbuttonantilog_Callback(hObject, eventdata, handles)
old=get(handles.text1,'string');
new=('exp(');               % taking antilog of any number
new1=strcat(old,new);
set(handles.text1,'string',new1);

% --- Executes on button press in pushbuttondot.
function pushbuttondot_Callback(hObject, eventdata, handles)
old=get(handles.text1,'string');
new=('.');
new1=strcat(old,new);
set(handles.text1,'string',new1);


% --- Executes on button press in pushbuttonhyperbola.
function pushbuttonhyperbola_Callback(hObject, eventdata, handles)
old=get(handles.text1,'string');
new= char();
for i= 1: (length (old))-1      % combination of both back space and add string so that we can delate bracket of sin and add hyperbola
  new(i)=old(i);
end
new1=('h(');
new2=strcat(new,new1);
set(handles.text1,'string',new2);


% --- Executes on button press in pushbuttoninverse.
function pushbuttoninverse_Callback(hObject, eventdata, handles)
old=get(handles.text1,'string');
new=('inv(');           % used for inverse of any number
new1=strcat(old,new);
set(handles.text1,'string',new1);


% --- Executes on button press in pushbuttonfactorail.
function pushbuttonfactorail_Callback(hObject, eventdata, handles)
old=get(handles.text1,'string');
new=('factorial(');     % used for factroial of any number
new1=strcat(old,new);
set(handles.text1,'string',new1);


% --- Executes on button press in pushbuttonans.
function pushbuttonans_Callback(hObject, eventdata, handles)
old=get(handles.text3,'string');        % taking result from output box and put on input box
new=get(handles.text1,'string');
new1=strcat(new,old);
set(handles.text1,'string',new1);


% --- Executes on button press in pushbuttoninversetran.
function pushbuttoninversetran_Callback(hObject, eventdata, handles)
old=get(handles.text1,'string');
new=('a');
new1=strcat(new,old);
set(handles.text1,'string',new1);
گام ششم ایجاد ماشین حساب با برنامه نویسی GUI در متلب
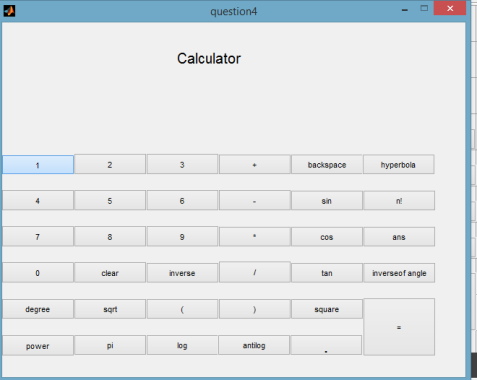
در گام آخر، باید کدها را اجرا کرد. تصویر خروجی کدهای فوق و ماشین حساب ایجاد شده با برنامه نویسی GUI در متلب در ادامه ملاحظه میشود:

پس از اضافه کردن کدها میتوان فایل .exe این برنامه را با استفاده از دستور «deploytool» تولید کرد. تنها کافی است این دستور در پنجره خط فرمان (Command) نرمافزار متلب تایپ و نام فایل برنامه به آن اضافه شود تا در نهایت فایل با پسوند .exe ایجاد گردد. میتوان قابلیتها و کارکردهای بیشتری را هم به پروژه اضافه کرد.
اگر این مطلب مفید واقع شده است، استفاده از دورههای آموزشی و مطالب زیر نیز پیشنهاد میشوند:
- مجموعه دورههای آموزش نرم افزار متلب (MATLAB)
- دوره آموزش برنامه نویسی متلب (MATLAB)
- مجموعه دورههای آموزش نکات و ترفندهای نرم افزار متلب (MATLAB)
- دوره آموزشی برنامه نویسی متلب پیشرفته
- منابع آموزشی نرم افزار متلب و برنامه نویسی کاربردی با آن
- ساخت یک ماشین حساب ساده در جاوا — از صفر تا صد
- ساخت اپلیکیشن ماشین حساب با فلاتر — از صفر تا صد
منبع [+]
مجموعه: برنامه نویسی, برنامه نویسی متلب برچسب ها: Matlab, آموزش GUI در MATLAB, آموزش MATLAB, آموزش پروژه محور Matlab, آموزش پروژه محور متلب, آموزش متلب, آموزش متلب فرادرس, آموزش های متلب, ایجاد ماشین حساب, ایجاد ماشین حساب با برنامه نویسی GUI, ایجاد ماشین حساب با متلب, ایجاد ماشین حساب در متلب, برنامه نویسی GUI متلب, برنامه نویسی Matlab, برنامه نویسی متلب, پروژه GUI در متلب, پروژه ماشین حساب با متلب, پروژه ماشین حساب در GUI نرم افزار matlab, ساخت برنامه ماشین حساب, ساخت ماشین حساب با متلب, ساخت ماشین حساب گرافیکی با متلب, فیلم آموزش متلب, فیلم های آموزش متلب فرادرس, کد ماشین حساب گرافیکی در متلب, کدنویسی برنامه ماشین حساب با متلب, ماشین حساب با استفاده از GUI مت لب, متلب, یادگیری متلب با پروژه


 (No Ratings Yet)
درسته که یکم پیچیده بود ولی از چیزی که فکرشو میکردم آسونتر بود
درسته که یکم پیچیده بود ولی از چیزی که فکرشو میکردم آسونتر بود
با سلام و احترام
ممنون از مباحث و مطالب مفیدتان
خیلی خوب و جذاب بود و موفق باشید و خسته نباشید
خیلی خوب و جذاب بود و موفق باشید و خسته نباشید